Showing posts with label Michaels Craft stores. Show all posts

Wednesday, January 21, 2015

Love Notes for Valentines Day

Hope the new year is treating you well. So far I have been keeping up with my New Years Resolutions, and it's been keeping me busy, which is a good thing. Since Valentines Day is less than a month away I wanted to share with you an easy little project that you can make and use starting now through Valentines Day. It's my love note heart project. The purpose of this project is to create a heart with a pocket where you can leave love notes for your sweetie, and your kids. I challenge you to put something new in it every day. Maybe words of encouragement, or a sweet reminder why you love them so much, or even a ticket for a date night out. These are just a few suggestions. 
So here is a list of the supplies that you will need.
  • Wooden Heart(I found mine at Michaels Craft Store)
  • Scrapbook paper
  • Crepe paper
  • Tickets or paper slips
  • Washi tape
  • Embellishments
  • Tape
  • Scissors
  • Pencil
The first step I did was to trace the shape of the heart on the back of the scrapbook paper that I was using. Then I cut out the shape of the heart using my scissors.

 After cutting the heart shape out, I then used my double sided tape at applied it to the wooden heart. I did this to add stability to the heart, so it wasn't just a flimsy piece of paper.
Next I took the crepe paper and pinch pleated it all around the heart using my tape. This is the most tedious part of the project. 
I then trimmed the crepe paper.
I found some small envelopes in the dollar section at Michaels a while back, and it worked out to be the perfect size for my center envelope. I attached it with tape. If you don't have these, you can make your own small envelope, or use a small paper bag. Most craft stores have those. 

Here is an example of the small bags you could use too.
The last step is to embellish your heart with words, or vintage Valentines. Get creative here, and make it your own. 


Hope you feel inspired to create a love notes heart for your nest. I think it's a fun way to stay connected with your immediate family and let them know how much you love them. Thanks for stopping by.
XO~Gretchen

Tuesday, December 30, 2014

Yarn Tassel Garland

Looking for a fun garland idea for your NYE party? How about making this super easy tassel garland, I made for my mantel. It's my twist on the popular tissue tassel garland, except this one won't be ruined if it accidentally gets wet. Speaking from experience here. ;) 
 Here is a list of the supplies you will need.

Extra thick or fluffyYarn (I found mine at Joann Crafts and Michaels Craft Store)
Scissors
Lace (Just another option)
Tape measure
First you will cut strips of the yarn and lace. I cute mine to about 14 inches. You can make yours as long or short as you'd like. To make mine extra fluffy I used 15 strips of yarn per tassel. 
Next you will just fold the strips in half.

 Then cut an extra piece to tie around the bundle. Then you end up with a tassel.


You can trim pieces as needed. I would make at least eight of these to make a tassel garland. Last step is to just string them together with a long piece of yarn. 
There are so many great yarn choices out there now, that you can really create some beautiful garlands. You can make one for NYE, a birthday party or shower, or a pink, red, and white one would be gorgeous for Valentines, which is just around the corner. I made several of these for gifts this year, they are just so fun!
Thanks for stopping by, hope you feel inspired to create a yarn garland of your own.
XO~Gretchen


Monday, October 6, 2014

Polka dot Witch Hat

Is is feeling like Autumn yet where you live? Well we got a big dose of it here this weekend. It was chilly, and the leaves are starting to change. So in the spirit of Halloween and Autumn, today I have a cute, and not so scary, witch hat project for you to complete. I actually worked on this project at a recent family craft night, we had so much fun! Here are the supplies that you will need.
A cardboard witch hat (I found mine at Michaels Craft Store)
Paint
Sponge brushes
Circle sponge brush (found at Michaels Craft Store)
Crepe paper
Halloween clip art and embellishments
Glue gun
A paper punch

The first step is to paint your witches hat. We used black paint from Plaster Paints, but you can use any black paint that you have.

While the black paint is drying you can plan out your embellishments.
I used some fringed crepe paper that I found at Target to line the base of the hat.

Then I decided it would be fun to add some polka dots to the hat, so I got out the orange paint, and dotted the hat!
Finished it off with the remainder of the embellishments that I had selected. I used vintage inspired stickers that I found at Vintage Style and Designs along with some fun scrapbook paper, and vintage book paper. This is where you can get really creative and personalize it to your liking. :)
Here is the one my aunt made for my Granny. I think she loves it! 
This is a great project to get a group of friends together and get creative! I placed my hat on my Halloween mantel, on a stack of vintage books. I like the way it turned out. 
You can see my completed Halloween mantel here.
Hope you feel inspired to make a witch hat for your Halloween decorations! 
Until next time...
XO~Gretchen

Monday, September 29, 2014

Light up BOO letters

I have another fun Halloween project for you today. I am going to show you how to create a light up BOO for your nest.
Here is a list of the supplies that you will need:
Cardboard letters (I found mine at Joann Craft Store)
Orange lights (Found at Michaels Craft Store)
Black paint
Paint brush
Plastic Spider (found at Michaels Craft Store)
String
Drill
Tape
Box cutter


The first step is to paint the letters. I painted them black, and decided to go with the traditional black and orange theme for Halloween.
It took two coats of the black paint.
After I allowed the paint to dry, I then cut the backs of the letters out. I did this so that it would be easier to poke the holes through, and I would have a place to hide the lights in the back.
Next, grab your drill to make the holes for the lights. I goofed and made my holes a little too big, however, I was able to fix it with a glue gun. I added a dab of glue around each hole so that the lights would sit securely. Problem solved, after sweating it out for 30 minutes ;)
Once you feed the lights into each hole, and make sure they sit securely in there, then you can put the extra lights and wires hidden in the back of each letter. I used 2 boxes of 50 count orange lights. The trick is to make sure that the letters sit really close together so that you don't see the string of lights in between.

I also added a spider's web to the middle O. I simply taped the twine on the back of the letter into a web pattern, and hung the spider.
There you have it! I created these same letters, on a much larger scale last year spelling out the word LOVE. You can find that blog post here
So here is what my Halloween mantel looks like with the light up BOO letters. 
A lot of the mantel decor I already had. I'm a big fan of using what you have, when you can. :) I purchased the banner last year at Target. They have some other great ones this year too, and if not then get out your cutting machine and make up your own! I used my handy dandy chalkboard. The inspiration for the drawing came from here.
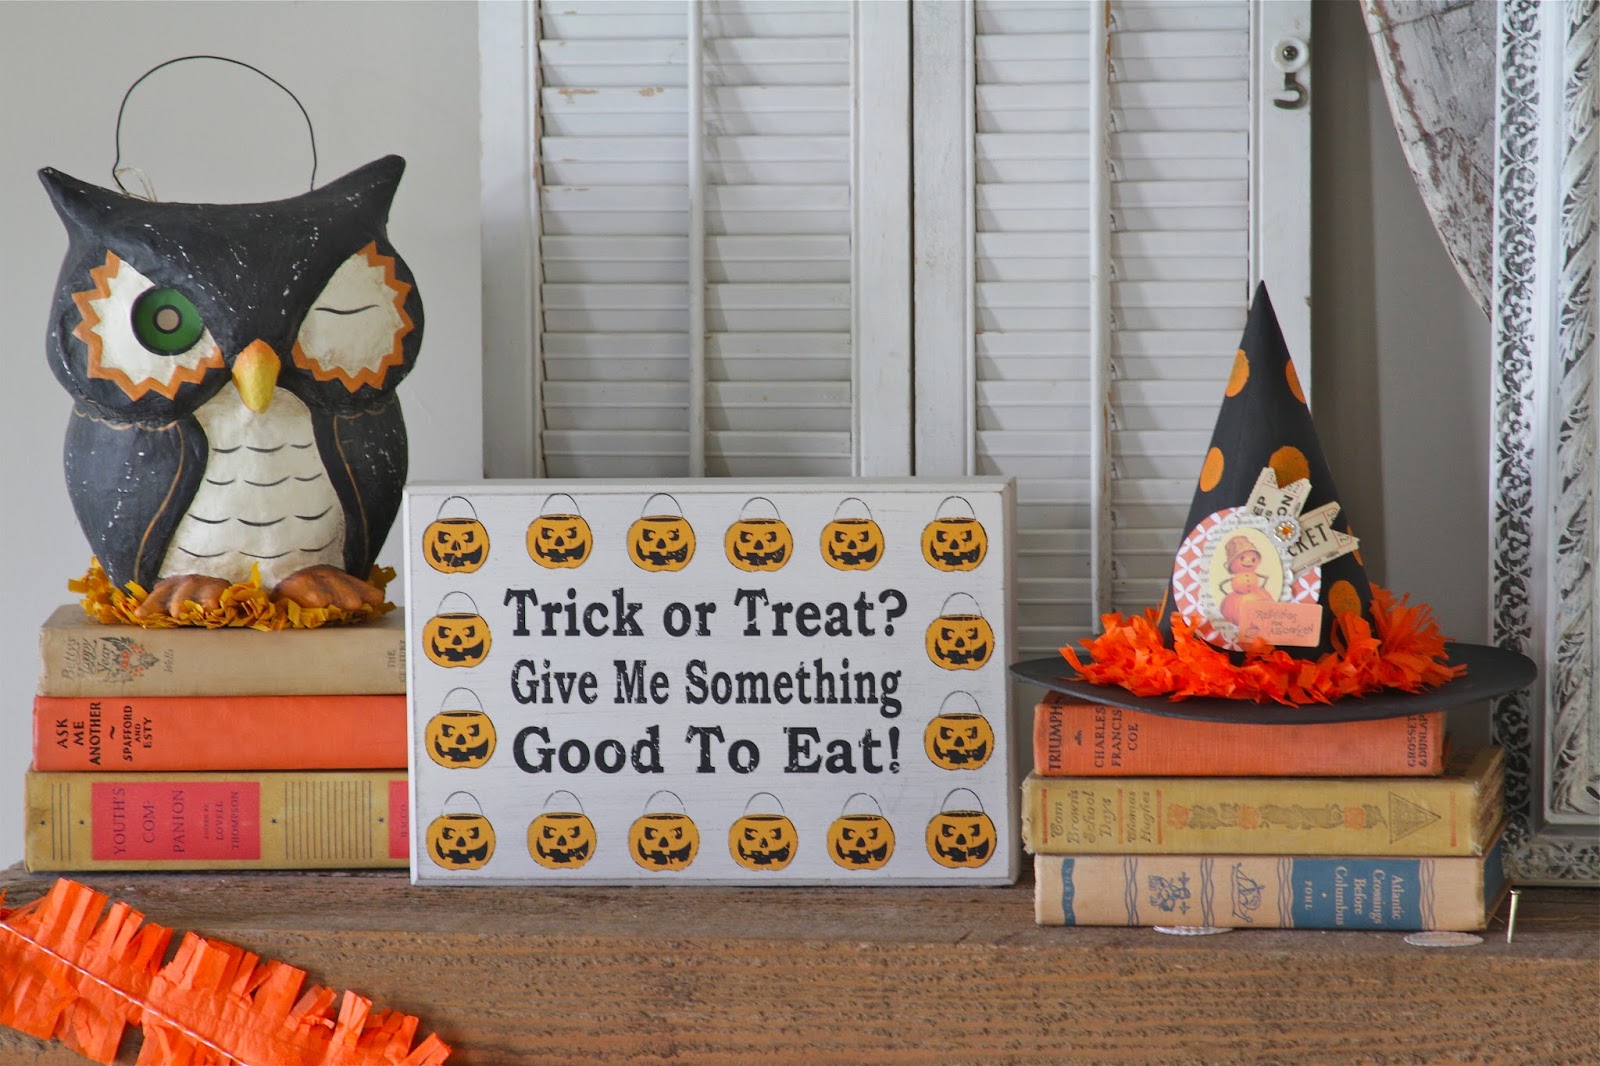
I used some of my old vintage books that I collect to add some height. The owl and the trick or treat sign came from good ol' TJ Maxx a few years back. I made the cut out pumpkin with my Cameo Silhouette. Here is the pattern.
I added the yarn pom poms to my banner. The shutters I've have, and they worked out to be a great place to hang some spooky spiders from. And lastly, I made the witches hat, and I have an easy tutorial coming soon, so you can make one too!


There you have it! Hope you feel inspired to add a little Halloween to your nest. Thanks for stopping by.
Until next time...
XO~Gretchen

Sunday, September 14, 2014

Polka Dot Pumpkin

It's not officially Fall yet, but now is the perfect time to start working on those fall craft projects, and start decorating your home. I have several projects that I will be sharing with you this Fall. They are all easy DIY craft projects. The first project is a burlap polka pumpkin that I created. You can first watch the easy video tutorial posted on WLKY, and then follow along with these easy steps. :)
Here are the supplies you will need for this project:
Burlap
Wooden loom (I found mine at Michaels Craft Store)
Black felt
Orange thread
Needle
Scissors
Orange crepe paper
Orange craft paint
A sponge brush in a circle shape (I also found this at Michaels Craft Store)
Scrapbook paper
Tickets (Found at a party supply store)
Double sided tape, and glue

The first step is to take the burlap and secure it in the wooden loom.
One you have it secured, you will add the orange polka dots simply by using the circle sponge and paint.

Next I added the face for my pumpkin. I chose a traditional face, but you can get as creative as you want and personalize your pumpkin's face. I cut the pieces of the face out of black felt.

I glued the felt pieces on to secure them to the burlap.

I then added a stem. I cut a simple stem design out of scrapbook paper, and left it to be further embellished later. I wanted to add a little more detail to the face, so I used some orange thread and completed a simple stitch detail around the eyes, nose, and mouth.
Once I finished that, I trimmed all the excess burlap from around the loom.
I thought the stem needed a little more embellishment so I added a few more pieces just for fun. I love using these old tickets I found antiquing, but you can use any tickets or ribbons you want.
 The last step is to add the crepe paper border. For this step you will use the double sided tape, and work in 3 to 4 inch strips. I applied the tape, then carefully pleated the crepe paper along the tape.
Once you have made your way around the loom, then you can go around and trim the crepe paper.
And voila' you are finished!

You can hang this pumpkin on your front door, or a wall in your home. I think it would be really great to hang in from an open frame and put it on your mantel. 
Thanks for stopping by, looking forward to showing you more fall projects soon!
Until next time, XO~Gretchen


Tuesday, March 11, 2014

Easter Bunny Banner

It is finally starting to feel a little like Spring around here. We have had a few nice sunny days, and although the forecast is calling for cold again soon, I appreciate the warmth while it is here. So I felt inspired to create a little bunny banner.
Supplies that I used for this project are as follows:
Silhouette machine, or any cutting machine you may have. I actually think this design is pretty easy that you could even trace it and hand cut it. :)
Crepe paper. I found this color at Target
Scrapbook paper. I used paper from one of my favorite designers Maggie Holmes.
Card stock. I used a pale aqua.
Colored twine. I used some brown and white, and some white and silver
Clips. I found mine at Michaels Craft Store
Yarn for pom poms.
The first thing that I did was cut out the bunny shape. I found the design online at the Silhouette Store.
This particular design was originally meant to be a card, but it worked out well since I needed multiple bunnies.
Next I cut the bunnies out. Then I made their bushy tails. I made their tails by using my pom pom maker which can be found at Michaels. I used twine instead of yarn, and used the smaller pom pom maker. It worked out really well. You don't need to wrap as much, and once you are finished you will trim the tail pretty short.
I then cut out the circle with a large punch. The circle measures about 3.5 inches and the bunnies I made 3 inches in length. After the circles were punched out I then put the double sided tape on the back. Once the back has the tape then you can start pleating the crepe paper. You just fold and pleat. 
 Mine always comes out uneven, so I just grab my scissors and trim it so that it is even.
Once it gets trimmed I added the bunny and the bunny tail. I glued the tail and used double sided tape for the bunny. You can decorate the bunny more if you would like. You could add glitter in the ears, but I kind of liked the simplicity of it.


Volia' here is the garland finished with the pom poms that I added. It is a very simple and sweet garland. I have it hanging along a mirror in our foyer! I love to decorate this piece in my foyer for each season. Now I need to pull out some more Easter decorations, maybe Mother Nature will catch my hint :)  Hope you feel inspired by this project. And if you make it, I'd love to see your finished project. You can tag me on IG. My IG name is @GretchenBlack.
Until next time.
XO~Gretchen